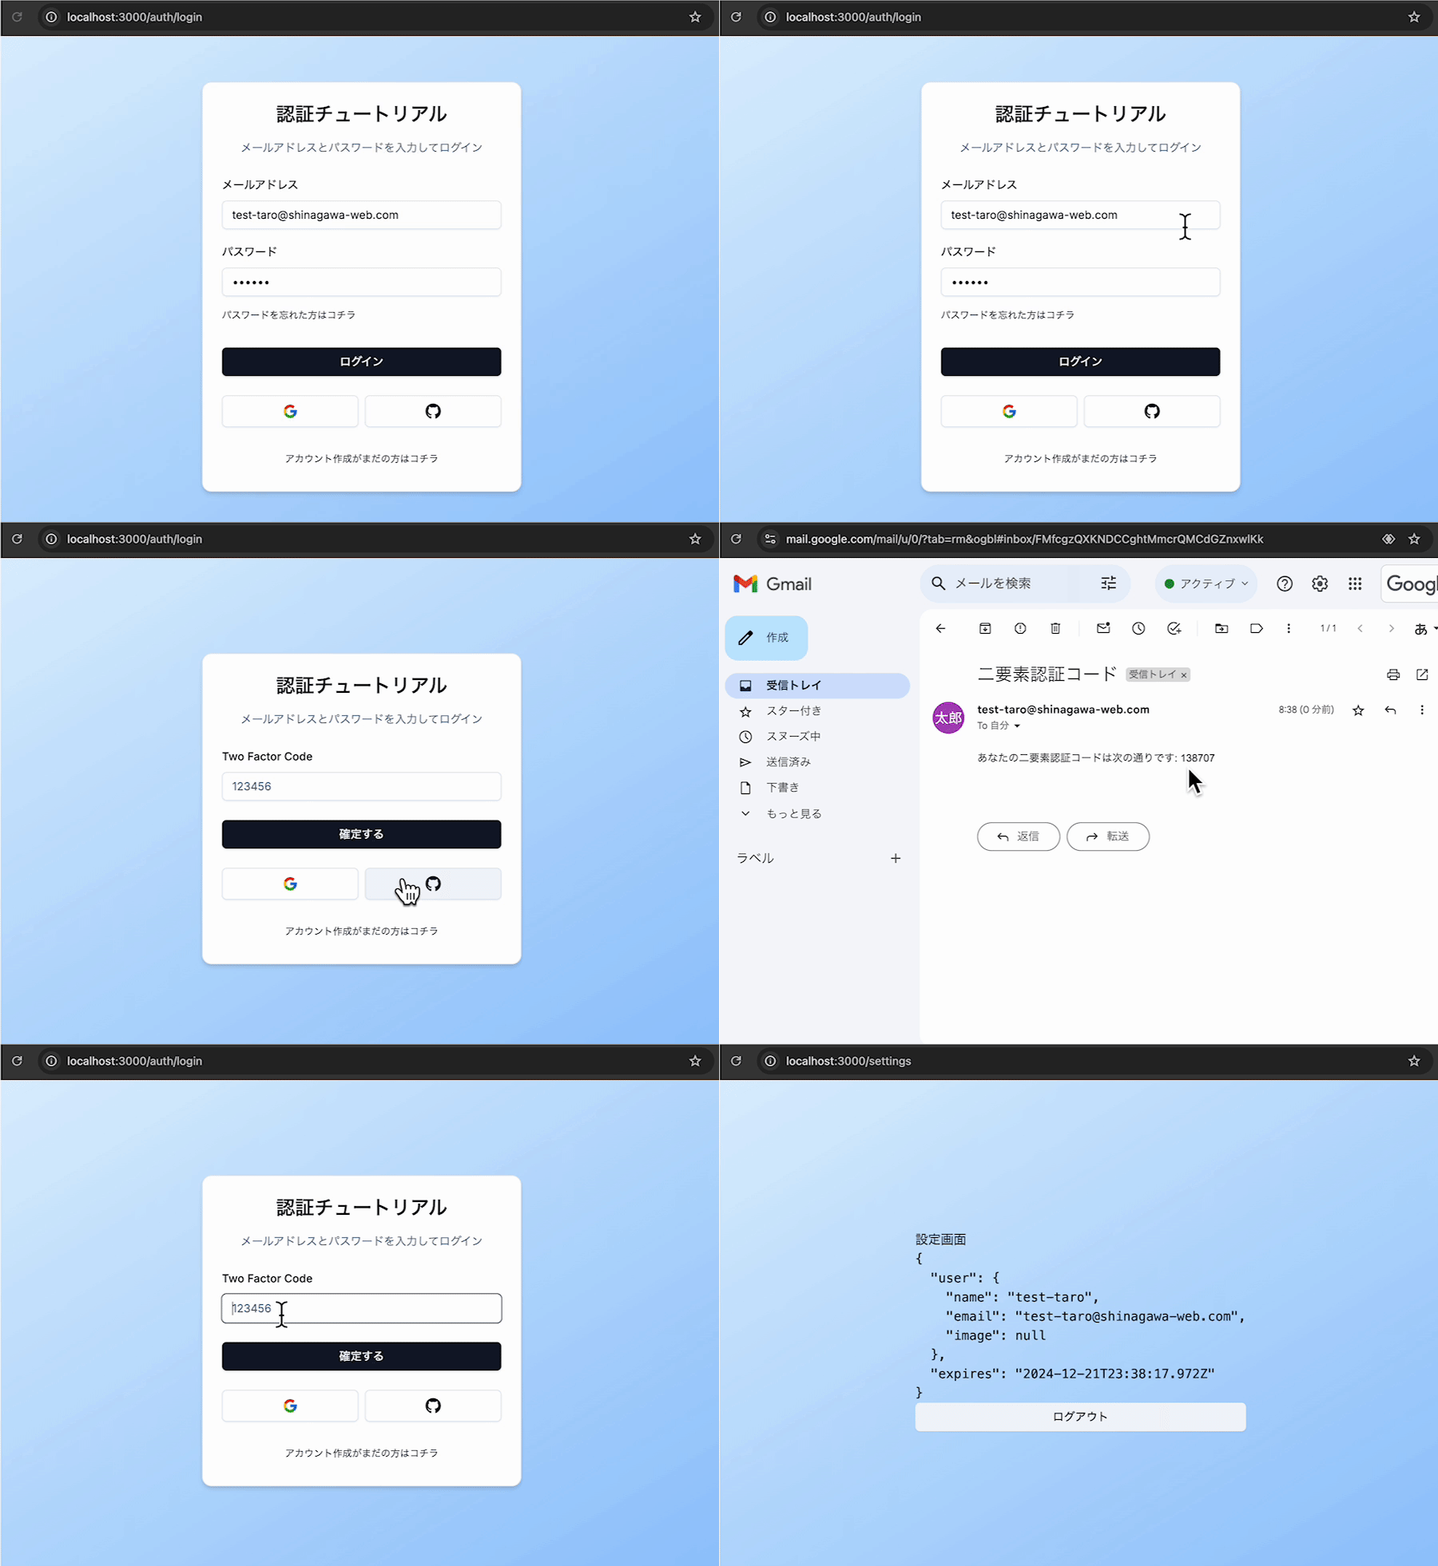
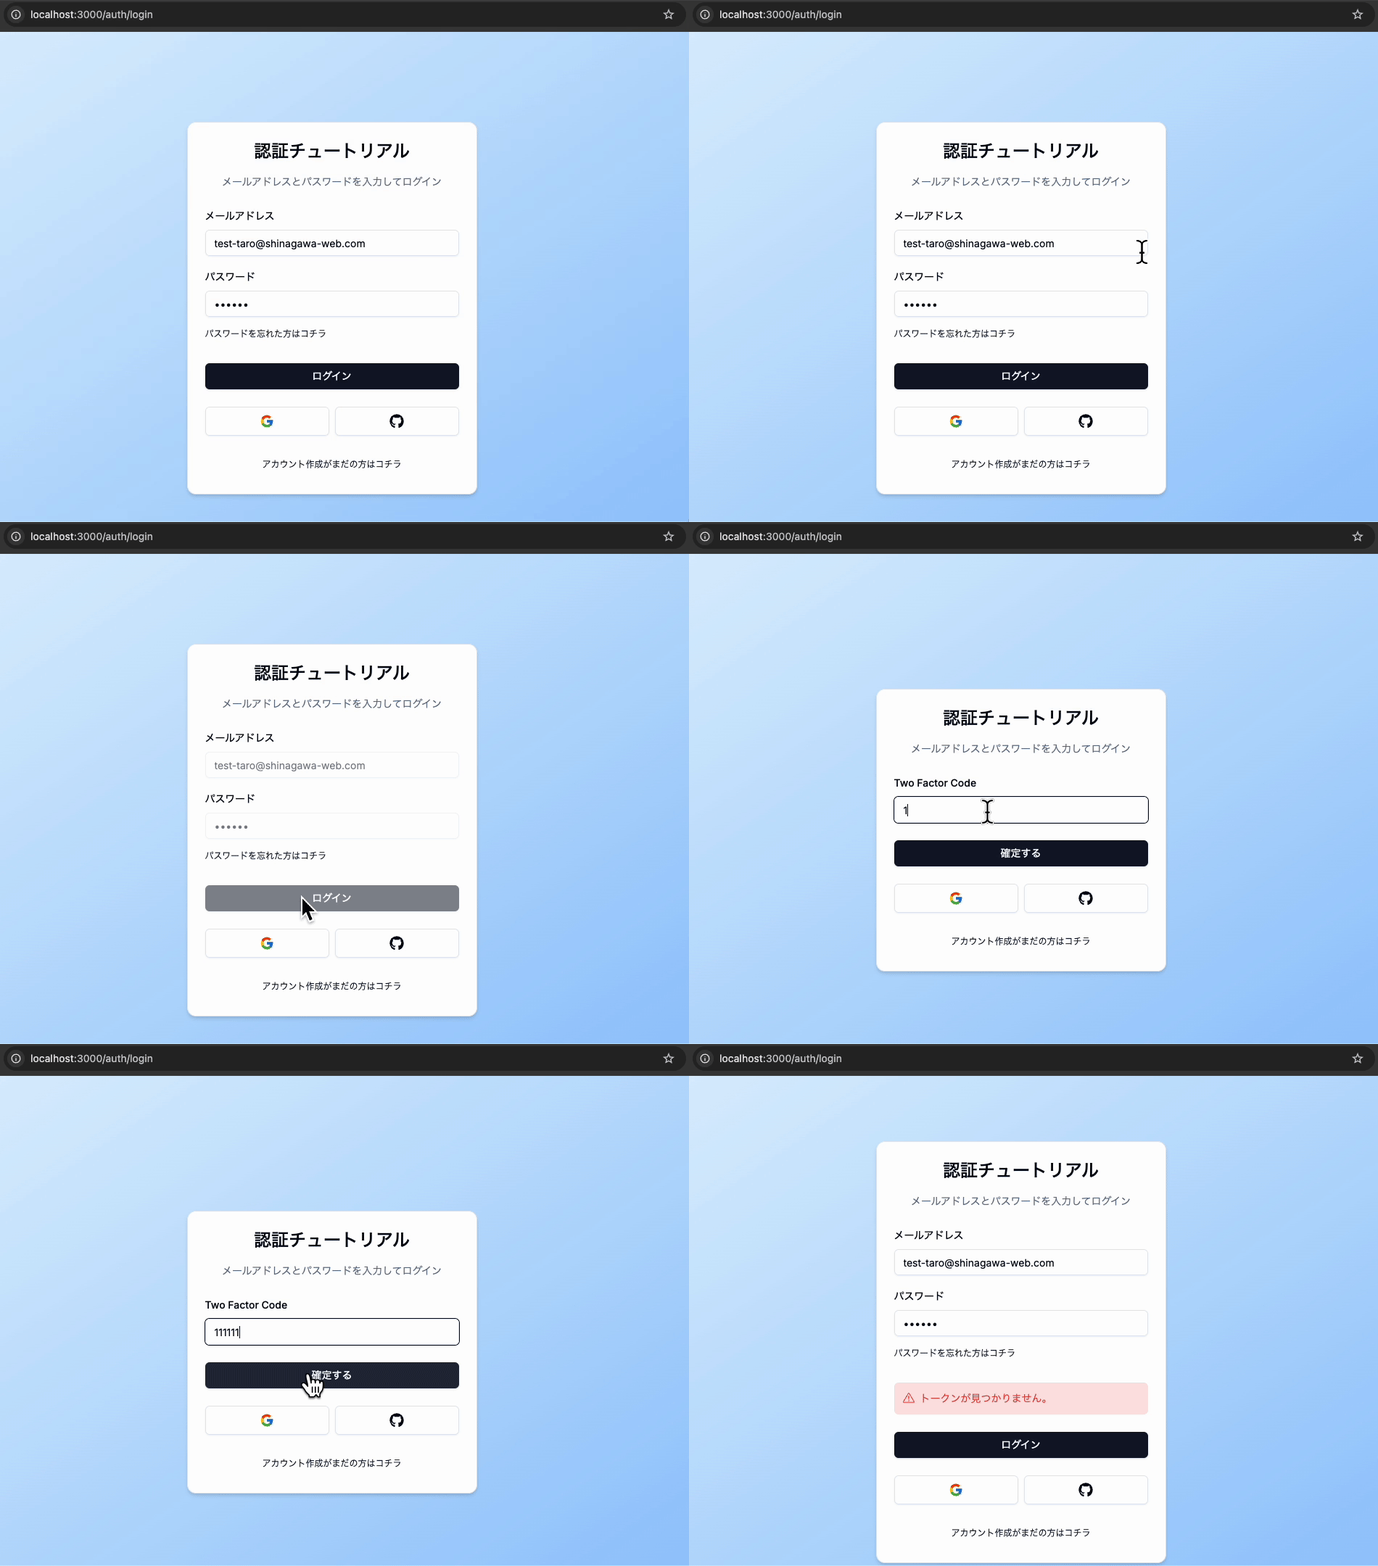
この投稿はでも表示されます。
はじめに
これまでの章はNext.jsとAuth.jsを使ってメールアドレスとパスワードによるアカウント登録からログイン、ログアウトの実装を行なってきました。最低限の認証機能は実現できましたがWebサービスとして運営していくには様々なケースを想定して機能を実装しておく必要があります。
- 登録したメールアドレスが正しいか検証(メールアドレスを活用して様々な案内、通知をするため)
- パスワードのリセット(パスワードを忘れてしまった利用者のため)
- ワンタイムトークンを発行し二要素認証によるセキュリティ強化
今回はそのうちの「ワンタイムトークンを発行し二要素認証によるセキュリティ強化」を実装していきます。
二要素認証について
二要素認証(にようそにんしょう、Two-Factor Authentication、2FA)は、セキュリティを強化するために使われる認証方式の一つで、2つの異なる要素を組み合わせて本人確認を行う仕組みです。
これにより、単一の認証情報(例えば、パスワード)だけでは不正アクセスされにくくなります。
二要素認証で使われる要素は以下の3つのカテゴリから選ばれます:
-
知識情報(Something you know)
あなたしか知らない情報
例:パスワード、PINコード、秘密の質問の答え -
所持情報(Something you have)
あなたが持っている物理的またはデジタル的なアイテム
例:スマートフォン、ハードウェアトークン、セキュリティキー、メールやSMSで受け取る認証コード -
生体情報(Something you are)
あなた自身の身体的特徴
例:指紋、顔認証、虹彩(目の一部)スキャン、声紋認証
メリット
- 不正アクセスやパスワード漏洩のリスクを軽減。
- セキュリティが強化され、重要な情報を保護できる。
注意点
- 所持情報(スマートフォンなど)を紛失した場合の復旧手続き。
- SMSやメールによる認証コードは完全ではなく、さらに高度な認証(セキュリティキーなど)の方が安全。
- 日常的な利用で簡単に導入できるため、個人情報や重要なアカウントを守るためにとても役立つ仕組みです!
今回のゴール
今回は比較的実装が簡単なメールで受け取る認証コードを二要素認証として扱います。
ログイン時にメールアドレス/パスワードを入力した後に、対象のメールアドレス宛に送られたワンタイムトークンを登録するとログインが可能となります。
二要素認証の処理の流れ
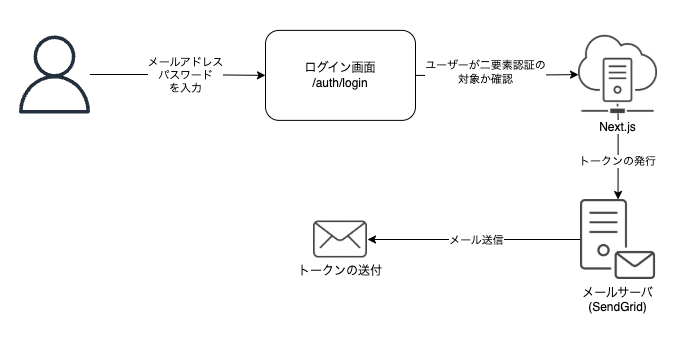
今回の一連の処理の流れをまとめてみました。
大きく2ステップに分かれます。
最初はワンタイムトークンをメールで送信するところまでとなります。
トリガーとしてはユーザーがメールアドレスとパスワードを入力するところとなります。
今回はユーザーごとに二要素認証を使うかどうかを制御できるようにしており、
二要素認証を使うユーザーがログインしたときだけトークンの発行処理が動くようになります。
ログイン画面でトークンを入力できるように今回は修正することで、メールで受け取ったワンタイムトークンを入力しログインが完了となります。
実装の流れ
- スキーマの定義修正(ワンタイムトークンの格納、ユーザーごとの二要素認証の設定情報など)
- トークンの生成処理、トークンの取得処理
- トークンをセットしたメール送信処理
- ログイン処理の修正(トークンの発行とメール送信)
- ログイン画面の修正(トークンを入力できる対応)
- ログイン処理の修正(トークンの検証)
今回は実装内容が多いため途中、動作確認を挟んでいこうと思います。
1. スキーマの定義修正
/prisma/schema.prismaに追加していきます。
Userモデルに追加
isTwoFactorEnabled: ユーザーが二要素認証を使うか?(デフォルトはfalseにしてあり、二要素認証を使用したいユーザーだけtrueに変える想定)
twoFactorConfirmation: 二要素認証の確認済みテーブル
model User {
+   isTwoFactorEnabled Boolean @default(false)
+   twoFactorConfirmation TwoFactorConfirmation?
}
新しくモデルを2つ追加します。
TwoFactorToken : トークンの管理用
TwoFactorConfirmation : 二要素認証の確認済みテーブル
model TwoFactorToken {
  id      String   @id @default(cuid())
  email   String
  token   String   @unique
  expires DateTime

  @@unique([email, token])
}

model TwoFactorConfirmation {
  id      String   @id @default(cuid())

  userId  String
  user   User     @relation(fields: [userId], references: [id], onDelete: Cascade)

  @@unique([userId])
}
定義の修正が完了しましたら型ファイルの再作成とデータベースのリセットを行います。
npx prisma generate
npx prisma migrate reset
npx prisma db push
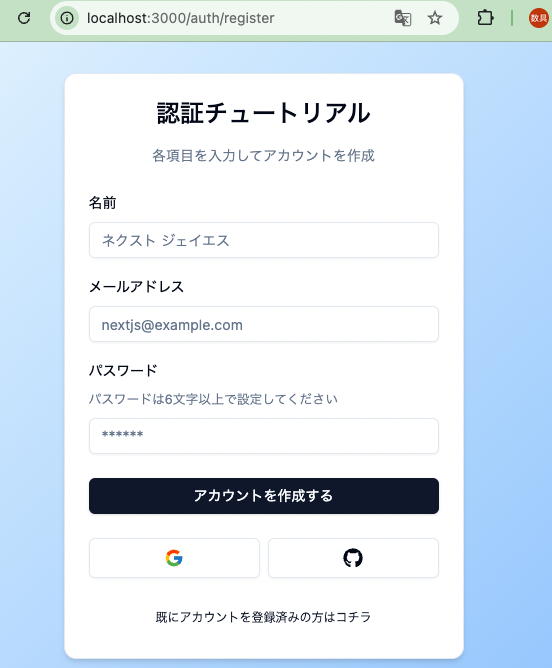
データベースをリセットしましたので再度新しいユーザーを/auth/registerから作成します。
ここの作業はこれまでと同じですので特に考慮することはありません。
作成したユーザーの設定を確認します。
Prisma Studioを立ち上げて作成したユーザーのisTwoFactorEnabled: falseになっていることを確認します。
npx prisma studio
2. トークンの生成処理、トークンの取得処理
トークンの取得処理についてはIDとメールアドレスそれぞれで取得できるよう2つ処理を用意します。
/data/two-factor-token.tsファイルを新たに用意し以下のコードを書いていきます。
import db from '@/lib/db'

export const getTwoFactorTokenByToken = async (token: string) => {
  try {
    const twoFactorToken = await db.twoFactorToken.findUnique({
      where: { token },
    })

    return twoFactorToken
  } catch {
    return null
  }
}

export const getTwoFactorTokenByEmail = async (email: string) => {
  try {
    const twoFactorToken = await db.twoFactorToken.findFirst({
      where: { email },
    })

    return twoFactorToken
  } catch {
    return null
  }
}
トークンの生成処理については既存のファイルに追記していく形で実装していきます。
/lib/tokens.ts
+ import crypto from 'crypto'
import { v4 as uuidv4 } from 'uuid'
import { getPasswordResetTokenByEmail } from '@/data/password-reset-token'
+ import { getTwoFactorTokenByEmail } from '@/data/two-factor-token'
import { getVerificationTokenByEmail } from '@/data/verification-token'
import db from '@/lib/db'

+ export const generateTwoFactorToken = async (email: string) => {
+   const token = crypto.randomInt(100_000, 1_000_000).toString()
+   const expires = new Date(new Date().getTime() + 5 * 60 * 1000)

+   const existingToken = await getTwoFactorTokenByEmail(email)

+   if (existingToken) {
+     await db.twoFactorToken.delete({
+       where: {
+         id: existingToken.id,
+       },
+     })
+   }

+   const twoFactorToken = await db.twoFactorToken.create({
+     data: {
+       email,
+       token,
+       expires,
+     },
+   })

+   return twoFactorToken
+ }
コードについて簡単に解説していきます。
const token = crypto.randomInt(100_000, 1_000_000).toString()
ランダムな6桁の数字を生成しています。
const expires = new Date(new Date().getTime() + 5 * 60 * 1000)
トークンの有効期限を設定しています。
今回はトークンを生成してから5分間としています。
  const existingToken = await getTwoFactorTokenByEmail(email);

  if (existingToken) {
    await db.twoFactorToken.delete({
      where: {
        id: existingToken.id,
      }
    });
  }
既にワンタイムトークンを生成していた場合は削除しておきます。
常に最新のワンタイムトークンのみ有効としておくためとなります。
ここで先ほど作成した関数getTwoFactorTokenByEmailを使用しています。
  const twoFactorToken = await db.twoFactorToken.create({
    data: {
      email,
      token,
      expires,
    }
  });

  return twoFactorToken;
最後にトークンと有効期限をデータベースに登録します。
登録後に一連の情報を返し、この後のメール送信処理に渡す予定です。
3. トークンをセットしたメール送信処理
生成したトークンをユーザーに渡すためのメールの送信処理を実装します。
/lib/mail.ts
+ export const sendTwoFactorTokenEmail = async (email: string, token: string) => {
+   await sendgrid.send({
+     from: 'test-taro@shinagawa-web.com',
+     to: email,
+     subject: '二要素認証コード',
+     html: `<p>あなたの二要素認証コードは次の通りです: ${token}</p>`,
+   })
+ }
メールアドレスとトークンを受け取ってメールを送信しています。
これでトークンの生成からメールの送信までできるようになりました。
この後、トリガーとなるログイン処理にこれらのコードを組み込んでいきます。
4. ログイン処理の修正(トークンの発行とメール送信)
/actions/login.tsファイルを開き二要素認証対象のユーザーの場合の処理を追加します。
'use server'
import { AuthError } from 'next-auth'
import { z } from 'zod'
import { signIn } from '@/auth'
import { getTwoFactorConfirmationByUserId } from '@/data/two-factor-confirmation'
import { getTwoFactorTokenByEmail } from '@/data/two-factor-token'
import { getUserByEmail } from '@/data/user'
import db from '@/lib/db'
- import { sendVerificationEmail } from '@/lib/mail'
+ import { sendTwoFactorTokenEmail, sendVerificationEmail } from '@/lib/mail'
- import { generateVerificationToken } from '@/lib/tokens'
+ import { generateTwoFactorToken, generateVerificationToken } from '@/lib/tokens'
import { DEFAULT_LOGIN_REDIRECT } from '@/route'
import { LoginSchema } from '@/schema'
export const login = async (values: z.infer<typeof LoginSchema>) => {
  const validatedFields = LoginSchema.safeParse(values)

  if (!validatedFields.success) {
    return { error: '入力内容を修正してください' }
  }

  const { email, password, code } = validatedFields.data

  const existingUser = await getUserByEmail(email)

  if (!existingUser || !existingUser.email || !existingUser.password) {
    return { error: 'Email does not exist!' }
  }

  if (!existingUser.emailVerified) {
    const verificationToken = await generateVerificationToken(
      existingUser.email,
    )
    const sendResult = await sendVerificationEmail(
      verificationToken.email,
      verificationToken.token,
    )
    if (sendResult.success) {
      return {
        success:
          'メールアドレスが未認証です。認証リンクをメールで再送しました。',
      }
    } else {
      return { error: '確認メールの送信に失敗しました' }
    }
  }

+   if (existingUser.isTwoFactorEnabled && existingUser.email) {
+       const twoFactorToken = await generateTwoFactorToken(existingUser.email)
+       await sendTwoFactorTokenEmail(twoFactorToken.email, twoFactorToken.token)

+       return { twoFactor: true }
+   }

  try {
    await signIn('credentials', {
      email,
      password,
      redirectTo: DEFAULT_LOGIN_REDIRECT,
    })
  } catch (error) {
    if (error instanceof AuthError) {
      switch (error.type) {
        case 'CredentialsSignin':
          return {
            error: 'メールアドレスもしくはパスワードが間違っています。',
          }
        default:
          return { error: 'エラーが発生しました。' }
      }
    }

    throw error
  }
}
少し長いですが`login.tsを一通り載せてあります。
ログイン処理の前に新たに処理を追加しています。
  if (existingUser.isTwoFactorEnabled && existingUser.email) {
    const twoFactorToken = await generateTwoFactorToken(existingUser.email)
    await sendTwoFactorTokenEmail(twoFactorToken.email, twoFactorToken.token)

    return { twoFactor: true }
  }
ログインしてきたユーザーがisTwoFactorEnabled: trueの場合に、トークンの生成とメールの送信を行います。
これらの処理が完了した後に、ログイン画面にtwoFactor: trueを返します。
この処理はログイン画面側でトークンを入力する欄を表示するために必要となります。
ログイン画面は初期段階では対象のユーザーが二要素認証を使うユーザーかどうかがわかりません。
ログイン処理を受け付けた後にサーバー側で判断できるのでその結果をログイン画面が受けてトークンを入力する欄を表示させます。
動作確認
まだ処理全体は実装できていませんが、まずはログイン処理をすることでトークン付きのメールが届くか確認します。
一番最初に行うのがisTwoFactorEnabled: trueの設定です。
一般的なアプリケーションであればユーザーがtrue/ falseを切り替えられる画面を用意するべきですが、実装までに少し時間がかかるので省略し、Prisma Studioで直接変更します。
Prisma Studioを起動したら下記の動画を参考に設定変更を行なってください。
npx prisma studio
完了しましたら実際にログイン処理を行いメールが届くことを確認します。
下記のようなメールが届いていたら成功です。
5. ログイン画面の修正
まず最初にトークンの受け渡しをサーバーとクライアントで行うためにzodのスキーマ定義を修正します。
/schema/index.ts
export const LoginSchema = z.object({
  email: z.string().email({
    message: 'メールアドレスを入力してください',
  }),
  password: z.string().min(1, {
    message: 'パスワードを入力してください',
  }),
+   code: z.optional(z.string()),
})
LoginSchemaにcodeを新たに追加しました。
codeが不要なケースもあるためオプショナルにしてあります。
次にサーバーから送られたtwoFactor: trueをログイン画面で受け取った際にトークンの入力欄を表示することです。
/components/auth/login-form.tsx
'use client'
import { zodResolver } from '@hookform/resolvers/zod'
import Link from 'next/link'
import { useState, useTransition } from 'react'
import { useForm } from 'react-hook-form'
import { z } from 'zod'
import { login } from '@/actions/login'
import { LoginSchema } from '@/schema'
import { FormError } from '../form-error'
import { FormSuccess } from '../form-success'
import { Button } from '../ui/button'
import {
  Form,
  FormControl,
  FormField,
  FormItem,
  FormLabel,
  FormMessage,
} from '../ui/form'
import { Input } from '../ui/input'
import { CardWrapper } from './card-wrapper'

export const LoginForm = () => {
  const [showTwoFactor, setShowTwoFactor] = useState(false)
  const [error, setError] = useState<string | undefined>('')
  const [success, setSuccess] = useState<string | undefined>('')
  const [isPending, setTransition] = useTransition()
  const form = useForm<z.infer<typeof LoginSchema>>({
    resolver: zodResolver(LoginSchema),
    defaultValues: {
      email: '',
      password: '',
    },
  })
  const onSubmit = async (values: z.infer<typeof LoginSchema>) => {
    setError('')
    setSuccess('')
    setTransition(async () => {
      try {
        const response = await login(values)
        setError(response?.error)
        setSuccess(response?.success)
        setShowTwoFactor(!!response?.twoFactor)
      } catch (e) {
        setError('エラーが発生しました')
      }
    })
  }

  const InputCode = () => (
    <FormField
      control={form.control}
      name="code"
      render={({ field }) => (
        <FormItem>
          <FormLabel>Two Factor Code</FormLabel>
          <FormControl>
            <Input {...field} disabled={isPending} placeholder="123456" />
          </FormControl>
          <FormMessage />
        </FormItem>
      )}
    />
  )
  const InputEmailAndPassword = () => (
    <>
      <FormField
        control={form.control}
        name="email"
        render={({ field }) => (
          <FormItem>
            <FormLabel>メールアドレス</FormLabel>
            <FormControl>
              <Input
                {...field}
                disabled={isPending}
                placeholder="nextjs@example.com"
                type="email"
                autoComplete="off"
              />
            </FormControl>
            <FormMessage />
          </FormItem>
        )}
      />
      <FormField
        control={form.control}
        name="password"
        render={({ field }) => (
          <FormItem>
            <FormLabel>パスワード</FormLabel>
            <FormControl>
              <Input
                {...field}
                placeholder="******"
                type="password"
                disabled={isPending}
              />
            </FormControl>
            <FormMessage />
            <Button
              size="sm"
              variant="link"
              asChild
              className="px-0 font-normal"
            >
              <Link href="/auth/reset">パスワードを忘れた方はコチラ</Link>
            </Button>
          </FormItem>
        )}
      />
    </>
  )
  return (
    <CardWrapper
      headerLabel="メールアドレスとパスワードを入力してログイン"
      buttonLabel="アカウント作成がまだの方はコチラ"
      buttonHref="/auth/register"
      showSocial
    >
      <Form {...form}>
        <form onSubmit={form.handleSubmit(onSubmit)} className="space-y-6">
          <div className="space-y-4">
            {showTwoFactor ? <InputCode /> : <InputEmailAndPassword />}
          </div>
          <FormError message={error} />
          <FormSuccess message={success} />
          <Button type="submit" className="w-full" disabled={isPending}>
            {showTwoFactor ? '確定する' : 'ログイン'}
          </Button>
        </form>
      </Form>
    </CardWrapper>
  )
}
広範囲にわたって修正が入るため全体のコードを載せています。
変更点について解説していきます。
const [showTwoFactor, setShowTwoFactor] = useState(false)
トークンを入力する欄を表示するかどうかの状態管理をuseStateで行います。
  const onSubmit = async (values: z.infer<typeof LoginSchema>) => {
    setError('')
    setSuccess('')
    setTransition(async () => {
      try {
        const response = await login(values)
        setError(response?.error)
        setSuccess(response?.success)
+       setShowTwoFactor(!!response?.twoFactor)
      } catch (e) {
        setError('エラーが発生しました')
      }
    })
  }
サーバーからtwoFactorが返ってきたらその内容をセットします。
  const InputCode = () => (

...

  )
ワンタイムトークンを入力する欄を構成するコンポーネントになります。
  const InputEmailAndPassword = () => (

...

  )
メールアドレスとパスワードを入力するコンポーネントになります。
こちらは元々作成してありましたが、今回のタイミングで切り出しています。
{showTwoFactor ? <InputCode /> : <InputEmailAndPassword />}
showTwoFactorの状態によってコンポーネントの表示を切り替えるよう設定しています。
{showTwoFactor ? '確定する' : 'ログイン'}
こちらもshowTwoFactorの状態によってボタンの表示名を変えています。
このように設定することで必要に応じてワンタイムトークンを入力する欄を表示できるようになりました。
動作確認
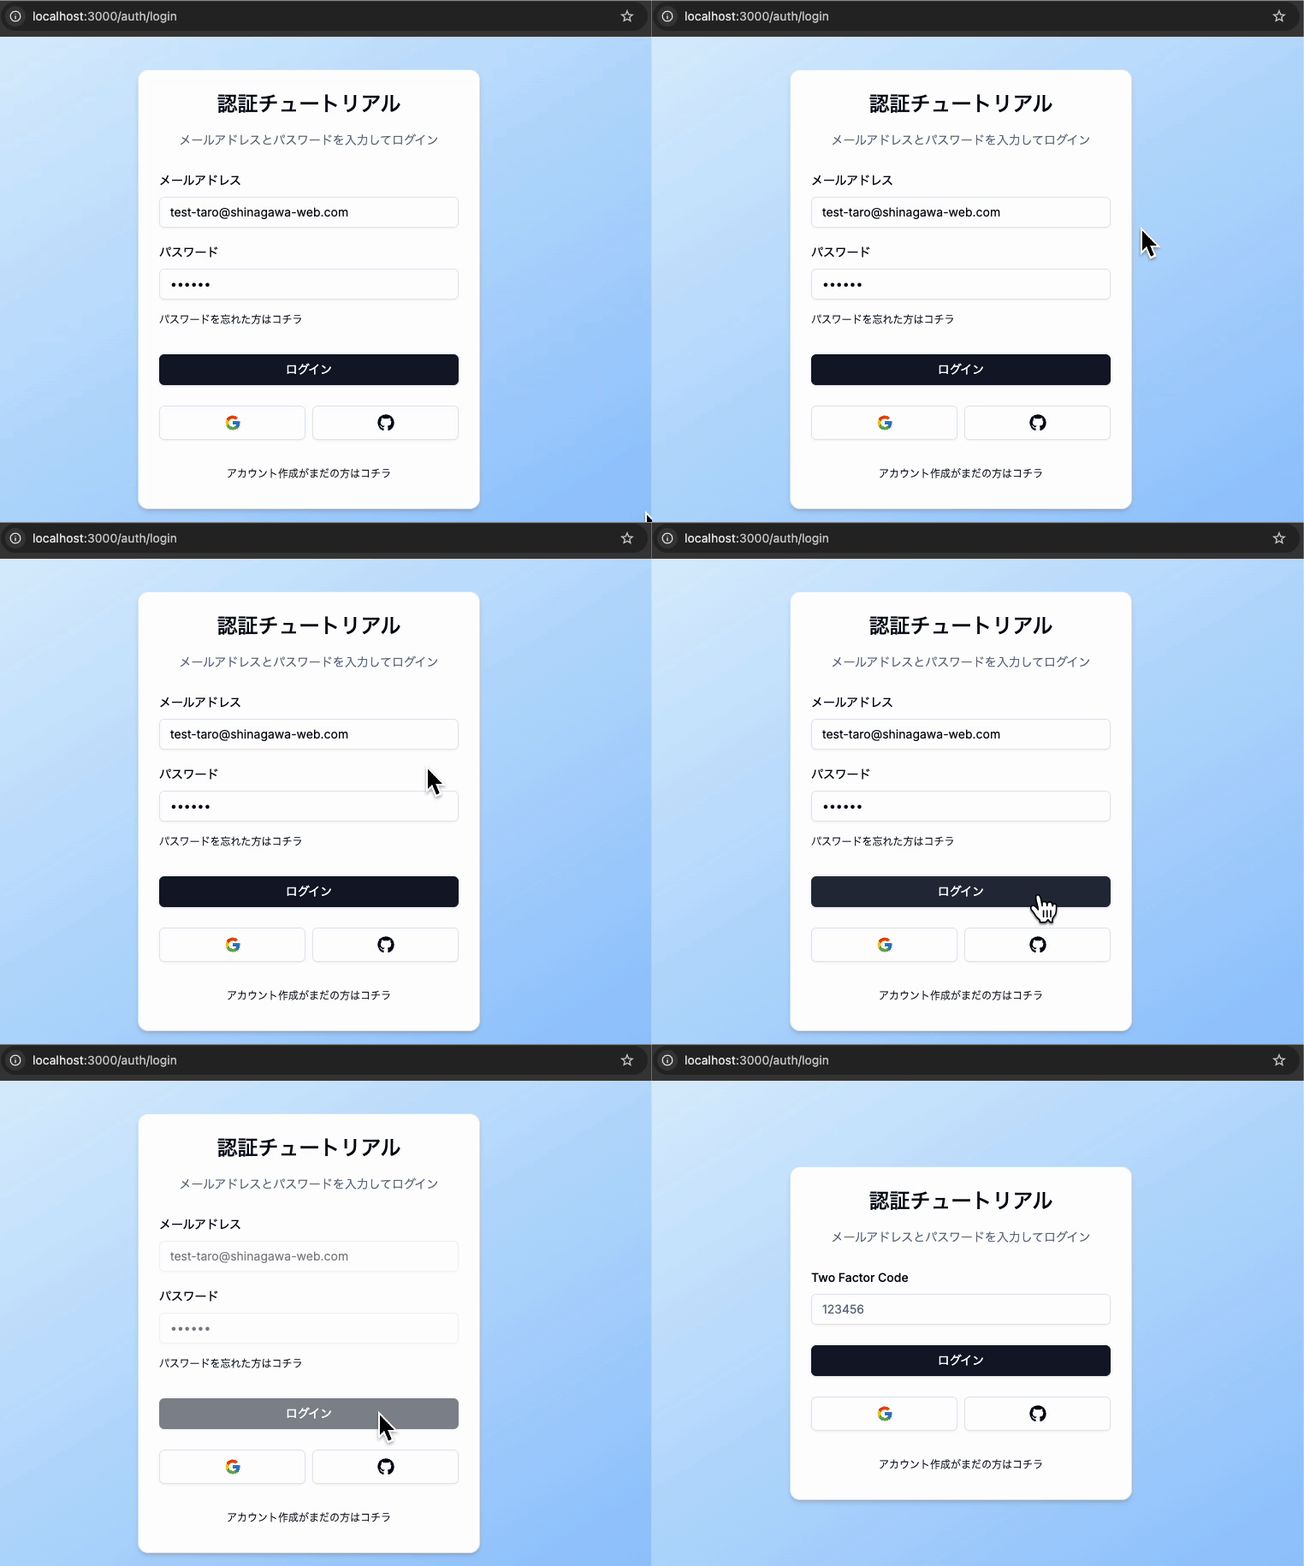
ここまで実装できましたら実際にワンタイムトークンを入力する欄が表示されるかテストしてみます。
/auth/login画面でログインを再びすると今度はトークンを入力する画面が表示されましたでしょうか。
1つ前の動作確認と同様、二要素認証のコードが届いていますでしょうか。
ここまで確認できましたら最後の実装になります。
6. ログイン処理の修正(トークンの検証)
先ほどの作業でログイン画面からトークンが入力され再度サーバーに送られることとなります。
サーバー側ではそれを受け取ってトークンの検証を行い問題なければログイン処理を行います。
その前に二要素認証の確認済みテーブルを扱う関係から下記のコードを実装します。
/data/two-factor-confirmation.ts
import db from '@/lib/db'

export const getTwoFactorConfirmationByUserId = async (userId: string) => {
  try {
    const twoFactorConfirmation = await db.twoFactorConfirmation.findUnique({
      where: { userId },
    })

    return twoFactorConfirmation
  } catch {
    return null
  }
}
このコードはユーザーIDを用いて二要素認証の確認済みテーブルから対象のユーザーが存在するかチェックするものとなります。
このコードを使ってlogin.tsを書き換えていきます。
+ import { getTwoFactorConfirmationByUserId } from '@/data/two-factor-confirmation'
+ import db from '@/lib/db'

(※一部省略)

+   const { email, password, code } = validatedFields.data

(※一部省略)

  if (existingUser.isTwoFactorEnabled && existingUser.email) {
+     if (code) {
+       const twoFactorToken = await getTwoFactorTokenByEmail(existingUser.email)

+       if (!twoFactorToken) {
+         return { error: 'トークンが見つかりません。' }
+       }

+       if (twoFactorToken.token !== code) {
+         return { error: 'トークンが見つかりません。' }
+       }

+       const hasExpired = new Date(twoFactorToken.expires) < new Date()

+       if (hasExpired) {
+         return { error: 'トークンの有効期限が過ぎています。' }
+       }

+       await db.twoFactorToken.delete({
+         where: { id: twoFactorToken.id },
+       })

+       const existingConfirmation = await getTwoFactorConfirmationByUserId(
+         existingUser.id,
+       )

+       if (existingConfirmation) {
+         await db.twoFactorConfirmation.delete({
+           where: { id: existingConfirmation.id },
+         })
+       }

+       await db.twoFactorConfirmation.create({
+         data: {
+           userId: existingUser.id,
+         },
+       })
+     } else {
      const twoFactorToken = await generateTwoFactorToken(existingUser.email)
      await sendTwoFactorTokenEmail(twoFactorToken.email, twoFactorToken.token)

      return { twoFactor: true }
+     }
  }
コードの解説をしていきます。
const { email, password, code } = validatedFields.data
LoginSchemaを修正したことでトークンが送られてくるようになりましたのでここで抽出します。
if (code) {
トークンがセットされてきた時の処理を開始します。
const twoFactorToken = await getTwoFactorTokenByEmail(existingUser.email)

if (!twoFactorToken) {
  return { error: 'トークンが見つかりません。' }
}

if (twoFactorToken.token !== code) {
  return { error: 'トークンが見つかりません。' }
}

const hasExpired = new Date(twoFactorToken.expires) < new Date()

if (hasExpired) {
  return { error: 'トークンの有効期限が過ぎています。' }
}
await db.twoFactorToken.delete({
  where: { id: twoFactorToken.id },
})
トークンの検証を行います。データベースで保存しているトークンと一致していなかったり有効期限外の場合はエラーを返しログイン画面上で表示できるようにします。
またトークンの検証で問題なかった場合はデータベースに保存してあるトークンを削除します。
const existingConfirmation = await getTwoFactorConfirmationByUserId(
  existingUser.id,
)

if (existingConfirmation) {
  await db.twoFactorConfirmation.delete({
    where: { id: existingConfirmation.id },
  })
}

await db.twoFactorConfirmation.create({
  data: {
    userId: existingUser.id,
  },
})
次に二要素認証の確認済みテーブルにユーザーIDを追加します。
過去に登録されている場合を考慮し事前にテーブルを確認し既にレコードが存在していたら消してから登録します。
動作確認
今回必要となる実装が全て完了しましたので最後に動作確認を行います。
ログイン時にメールアドレス/パスワードを入力した後に、対象のメールアドレス宛に送られたワンタイムトークンを登録するとログインが可能となります。
また適当なトークンをセットするとログイン画面にエラーメッセージが表示されます。
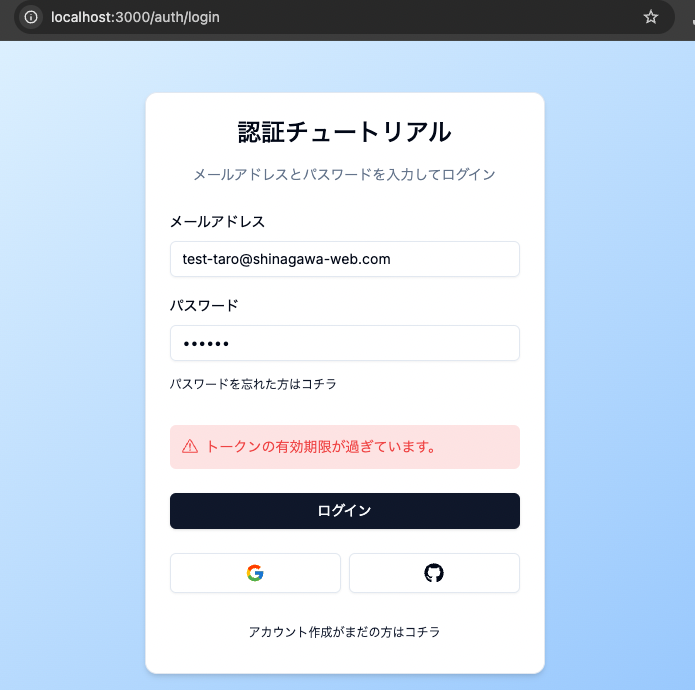
トークンが一致していても有効期限(生成から5分間)を過ぎるとログイン画面にエラーメッセージが表示されます。
さいごに
今回は「ワンタイムトークンを発行し二要素認証によるセキュリティ強化」というテーマでNext.jsでどのように二要素認証を実装していくかご紹介しました。
メールだけでなくSMSによるトークンの通知も比較的多く実装されているかと思います。
SMSの場合の実装方法など機会がありましたらご紹介できたらと思います。
関連する技術ブログ
GraphQL・REST API の堅牢な認可設計:RBAC・ABAC・OAuth 2.0 のベストプラクティス
2024/05/13チャットアプリ(画像・PDF送信、ビデオ通話機能付き)
2024/07/15React × Tailwind CSS × Emotionで実践するコンポーネント設計ガイド:デザインシステム・状態管理・再利用性の最適解
2024/11/22管理ダッシュボード機能(グラフ表示、データ取り込み)
2024/06/02NestJSで記事投稿APIを作ろう ─ Prisma導入とCRUD実装の基本
2025/04/12NestJSアプリの信頼性を高める ─ ログ・エラーハンドリング・テスト戦略
2024/09/11NestJS × Prismaで深めるDB設計 ─ モデル・リレーション・運用設計
2024/09/12NestJS × React × Railway:ブログUIを実装して本番環境へデプロイ
2024/10/25


