この投稿はでも表示されます。
はじめに
ここまでで、NestJSとPrismaを使った記事投稿APIの基本的な構成が一通り整いました。
APIとして動作することは確認できましたが、実際のサービス運用を見据えると、正常に動くだけでは不十分な場面が多くあります。
たとえば以下のような状況です。
- 本番環境でエラーが発生した際に、原因をすぐに特定できるか
- ユーザーからの「動作がおかしい」という報告に、ログを手がかりに対応できるか
- 意図しない形式のデータが送られてきたとき、適切に弾けるか
- 機能追加によって、既存の挙動に影響が出ていないことを確認できるか
こうした不安要素を減らし、信頼されるAPIとしての品質を高めていくために、エラーハンドリングやロギング、テストといった仕組みを整備していく必要があると考えています。
今回は、以下の4つの観点からアプリケーションの信頼性を高める取り組みを進めていきます。
- ログの整備:NestJSのLogger機能を使い、出力内容と形式を整理します
- 例外処理の共通化:ExceptionFilterを導入し、エラーの扱いを一元化します
- テストの導入:Service層のユニットテストと、DBを含めたE2Eテストを作成します
- 設定ファイルの分離:テスト用の
.env.testを用意し、開発環境と分けて運用できるようにします
本番運用を見据えたとき、「動くコード」であることに加えて「安心して預けられるコード」であることが求められます。
今回はその第一歩として、信頼性の高いAPIへと進化させていくための仕組みづくりに取り組みます。
この連載の全体像と今回の位置づけ
連載構成
- NestJSで始めるWebアプリ開発 ─ ブログサイトを作りながら学ぶプロジェクト構成と設定管理
- NestJSで記事投稿APIを作ろう ─ Prisma導入とCRUD実装の基本
- アプリの信頼性を高める ─ ロギング・エラーハンドリング・テスト戦略 ←
今回の記事 - PrismaとDB設計を深掘る ─ モデル・リレーション・運用設計
- ReactでUIを構築して本番へデプロイ ─ Dockerと環境構築
今回実装したコードはこちらのリポジトリに格納してありますので合わせてご参照ください。
NestJSのLogger活用と出力フォーマット
アプリケーションの運用中に何が起きているかを把握するには、ログの整備が欠かせません。
NestJSでは、標準で Logger クラスが用意されており、特別な準備なしにアプリ全体で統一されたログ出力が可能です。
今回は、この Logger クラスを活用して、ログの出力内容と形式を見直していきます。
基本的な使い方
NestJSの Logger は、任意のクラスや関数内でインポートして使用できます。
import { Logger } from '@nestjs/common';

const logger = new Logger('MyContext');

logger.log('通常のログ');
logger.warn('警告ログ');
logger.error('エラーログ', error.stack);
第一引数にはメッセージ、第二引数にはエラー詳細(例:stack trace)を指定できます。
クラスごとに new Logger('クラス名') のようにコンテキスト名を与えておくことで、出力時に識別しやすくなります。
実行時の出力例
下記のように、ログレベル・タイムスタンプ・コンテキストが標準で含まれており、特に設定しなくても最低限の可読性は確保されています。
[Nest] 43018   - 2025/04/23 18:30:25   LOG [MyContext] 通常のログ
[Nest] 43018   - 2025/04/23 18:30:25  WARN [MyContext] 警告ログ
[Nest] 43018   - 2025/04/23 18:30:25 ERROR [MyContext] エラーログ
アプリ全体でログを出力する
サービスやコントローラなどでも同様に Logger を使うことができます。
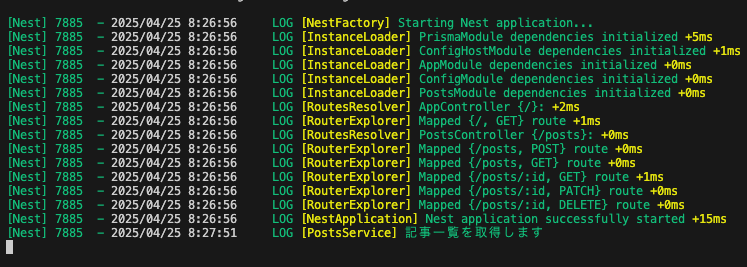
今回は記事一覧取得のAPIが呼ばれた時にログを出力するよう設定してみます。
+ import { Logger } from '@nestjs/common';

@Injectable()
export class PostsService {
+ private readonly logger = new Logger(PostsService.name);

  findAll() {
+   this.logger.log('記事一覧を取得します');
    return this.prisma.post.findMany();
  }
}
PostsService.nameを使えば、クラス名がそのままログのコンテキストとして表示されるため、管理もしやすくなります。
第2回の記事でご紹介した方法でAPIにアクセスするとサーバー側にログが出力されていることを確認できます。
ログ出力の拡張(カスタムLoggerの導入)
NestJSの Logger はそのままでも便利ですが、運用を意識するなら「ログをファイルに残す」「外部サービス(例:Datadog, Sentry)に送る」など、出力先を制御したくなる場面が必ず出てきます。
そういうときに使うのが カスタムLoggerの実装 となります。
なぜカスタムLoggerが必要になるのか?
| やりたいこと | デフォルトLoggerでできる? | カスタムLoggerでできる |
|---|---|---|
| ターミナルにログ出力 | ✅ できる | ✅ できる |
| ログをファイルに保存 | ❌ できない | ✅ できる |
| 特定のログだけフィルタして保存 | ❌ できない | ✅ できる |
| ログを外部サービス(例:Sentry)に送る | ❌ できない | ✅ できる |
| JSON形式で構造化して出力 | ❌ できない | ✅ できる |
実装のイメージ
今回はコードの紹介のみとなりますが、カスタムLoggerでログをファイル出力する方法についてご紹介します。
1. カスタムLoggerを作る
import { LoggerService, LogLevel } from '@nestjs/common';
import * as fs from 'fs';

export class CustomLogger implements LoggerService {
  log(message: string) {
    this.writeToFile('LOG', message);
  }

  error(message: string, trace?: string) {
    this.writeToFile('ERROR', `${message} \n ${trace}`);
  }

  warn(message: string) {
    this.writeToFile('WARN', message);
  }

  private writeToFile(level: LogLevel, message: string) {
    const log = `[${new Date().toISOString()}] [${level}] ${message}\n`;
    fs.appendFileSync('app.log', log);
  }
}
この例では、すべてのログが app.log に追記されます。
2. アプリケーションに適用する
import { NestFactory } from '@nestjs/core';
import { AppModule } from './app.module';
import { CustomLogger } from './common/logger/custom-logger.service';

async function bootstrap() {
  const app = await NestFactory.create(AppModule, {
    logger: new CustomLogger(),
  });

  await app.listen(3000);
}
bootstrap();
このように設定すると、Logger.log() などがすべて CustomLogger 経由で処理されるようになります。
応用例
- ログレベルごとに別ファイルに書き出す
- エラーだけSentryに送る
- JSON形式で構造化出力(Fluentdなどと連携しやすくなる)
- CLI環境・本番環境・テスト環境でログ出力を切り替える
ログの整備によって得られる効果
- 何が起きたかを後から追跡できる
- バグ報告に対して再現手順が明確になる
- 異常系をログとして可視化し、検知しやすくなる
開発初期のうちは console.log() でも十分ですが、ログを整えることで「目に見える安心感」を得ることができます。
エラーハンドリング
API開発を進める中で、意図しないリクエストやシステムエラーが発生する場面は避けられません。
NestJSには HttpException をはじめとした標準のエラーハンドリング機構がありますが、出力されるエラーレスポンスの形式が一定ではなく、ログにも統一感がありません。
そこで今回は、ExceptionFilter(例外フィルター)を使って、例外の扱いと出力形式を統一するようにします。
ExceptionFilterとは?
ExceptionFilter は、NestJSが提供する例外処理を横断的に制御するための仕組みです。
特定の例外(またはすべての例外)を捕捉し、ログの出力やレスポンスの整形を一元的に行うことができます。
独自Filterの作成
まずは例外フィルターのクラスを作成します。
npx nest g filter common/filters/http
すると、下記のようなファイルが生成されるかと思います。
これは、NestJSで発生した例外を横取り(キャッチ)して、自分で処理するためのクラス定義です。
NestJSでは、ExceptionFilter という仕組みを使って、グローバルまたは特定の例外を処理するロジックを定義できます。
import { ArgumentsHost, Catch, ExceptionFilter } from '@nestjs/common';

@Catch()
export class HttpFilter<T> implements ExceptionFilter {
  catch(exception: T, host: ArgumentsHost) {}
}
@Catch()デコレーター- 引数なしの場合: すべての例外(Error を含む)を対象にする
catch()メソッド- 例外が発生したときに自動で呼び出されます。
exception: T:実際に発生した例外(HttpException, Error, ValidationErrorなど)host: ArgumentsHost: 実行環境のコンテキスト(リクエスト、レスポンス、GraphQLの場合などにアクセス可)
このコード、いわば「例外処理を自作するための足場」で、この先にレスポンス整形やログ出力を組み込んでいく感じになります。
ということで早速ログ出力とレスポンスの整形をしたコードがこちらになります。
import {
  ExceptionFilter,
  Catch,
  ArgumentsHost,
  HttpException,
  HttpStatus,
  Logger,
} from '@nestjs/common';
import { Request, Response } from 'express';

@Catch()
export class HttpExceptionFilter implements ExceptionFilter {
  private readonly logger = new Logger(HttpExceptionFilter.name);

  catch(exception: unknown, host: ArgumentsHost) {
    const ctx = host.switchToHttp();
    const response = ctx.getResponse<Response>();
    const request = ctx.getRequest<Request>();

    const status =
      exception instanceof HttpException
        ? exception.getStatus()
        : HttpStatus.INTERNAL_SERVER_ERROR;

    let message = 'Internal server error';

    if (exception instanceof HttpException) {
      const res = exception.getResponse();

      if (
        typeof res === 'object' &&
        res !== null &&
        'message' in res &&
        typeof (res as Record<string, unknown>).message === 'string'
      ) {
        message = (res as Record<string, unknown>).message as string;
      }
    }

    this.logger.error(
      `[${request.method}] ${request.url}`,
      JSON.stringify(message),
    );

    response.status(status).json({
      statusCode: status,
      timestamp: new Date().toISOString(),
      path: request.url,
      message,
    });
  }
}
catch() メソッドの中身について補足します。
const ctx = host.switchToHttp();
const response = ctx.getResponse<Response>();
const request = ctx.getRequest<Request>();
- リクエスト・レスポンス情報の取り出し
- switchToHttp() を使って HTTP(Express)に絞り込み
- getResponse() / getRequest() でそれぞれのオブジェクトを取得
const status =
  exception instanceof HttpException
    ? exception.getStatus()
    : HttpStatus.INTERNAL_SERVER_ERROR;
- ステータスコードの決定
HttpException系であれば、例外自体がステータスコードを持っている- そうでなければ(予期せぬ例外なら)
500(INTERNAL_SERVER_ERROR)を返す
let message = 'Internal server error';

if (exception instanceof HttpException) {
  const res = exception.getResponse();

  if (
    typeof res === 'object' &&
    res !== null &&
    'message' in res &&
    typeof (res as Record<string, unknown>).message === 'string'
  ) {
    message = (res as Record<string, unknown>).message as string;
  }
}
- メッセージの取得
HttpExceptionの場合はgetResponse()で人間にわかる内容(またはDTOバリデーションのエラーリスト)が取得可能- それ以外の例外はそのまま
exceptionを返す(ログ出力用)
this.logger.error(
  `[${request.method}] ${request.url}`,
  JSON.stringify(message),
);
- ログ出力
- ここでは「HTTPメソッド + パス」と「メッセージ」を出力している
- ※ JSON.stringify でメッセージの内容が配列・オブジェクトでも安全にログに出せる
response.status(status).json({
  statusCode: status,
  timestamp: new Date().toISOString(),
  path: request.url,
  message,
});
- クライアントへのレスポンス
- ステータスコードを指定して、共通フォーマットのJSONレスポンスを返す
- これにより、フロントエンド側では「エラーが来たときは
messageを見ればいい」という処理が共通化できる
グローバル適用の設定
作成したFilterをアプリ全体に適用するには、main.ts で app.useGlobalFilters() を呼び出します。
import { NestFactory } from '@nestjs/core';
import { AppModule } from './app.module';
import { ValidationPipe } from '@nestjs/common';
+ import { HttpExceptionFilter } from './common/filters/http/http.filter';

async function bootstrap() {
  const app = await NestFactory.create(AppModule);
  app.useGlobalPipes(new ValidationPipe());
+ app.useGlobalFilters(new HttpExceptionFilter());
  await app.listen(process.env.PORT ?? 3000);
}
bootstrap().catch((err) => {
  console.error('Application failed to start', err);
});
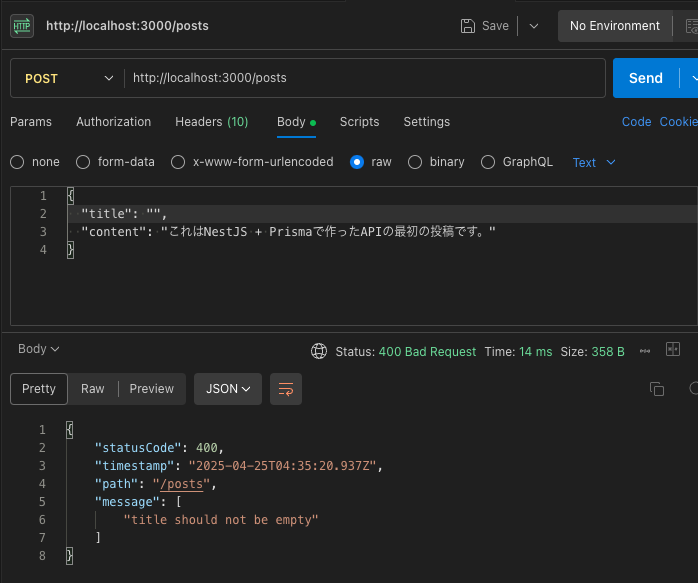
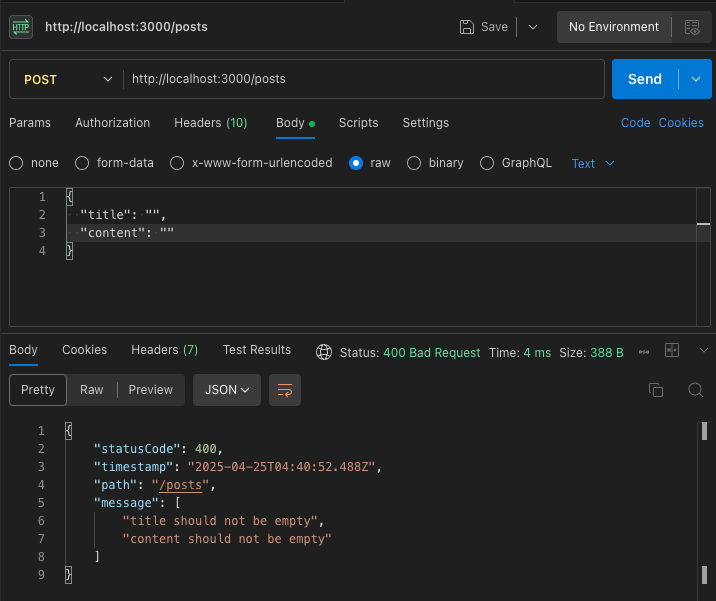
新規投稿のAPIでタイトルを空にして実行すると下記のようなレスポンスが返ってきます。
先ほど作成した独自Filterでのステータスコードやタイムスタンプ、メッセージなどが正しくセットされていることが確認できます。
また、サーバー側でもログが出力されていることが確認できます。
メッセージについては配列となっており、複数のメッセージが格納できるようになっております。フロントエンド側ではこのメッセージを使って画面に表示させることができます。
また、サーバー側でもログが出力されていることが確認できます。
Service層のユニットテスト
アプリケーションの内部ロジックが、仕様通りに正しく動作していることを確認するために、ユニットテストを整備することにしました。
ユニットテストは、関数単体の振る舞いに焦点を当て、その関数が与えられた入力に対して、正しい出力や処理を行っているかを確認するためのテストです。
特に、Service層は「データベースにどう問い合わせるか」「リクエストに対してどんなデータ構造を返すか」など、ビジネスロジックに近い重要な処理が集中する場所です。
ここを丁寧にテストしておくことで、機能追加やリファクタリングを行う際にも安心感が得られます。
ユニットテストの特徴
ユニットテストでは、対象となる関数の挙動を検証するために、外部依存(DBやAPIなど)をモック化(仮の動作に差し替え)します。
これにより、実際にデータベースを起動したり、データの中身を気にすることなく、関数単体に集中したテストを行うことができます。
今回は、記事投稿機能を担当する PostsService を対象に、基本的なメソッド(作成・取得・ID指定取得)についてユニットテストを実装します。
PrismaServiceをモック化しながら、各メソッドが期待通りにPrisma Clientを呼び出しているかを確認しています。
テスト対象のメソッド
以下は、Service層に実装しているメソッドです。
これらの動作を確認するためのテストを書いていきます。
import { Injectable } from '@nestjs/common';
import { CreatePostDto } from './dto/create-post.dto';
import { UpdatePostDto } from './dto/update-post.dto';
import { PrismaService } from 'src/prisma/prisma.service';
import { Logger } from '@nestjs/common';

@Injectable()
export class PostsService {
  constructor(private readonly prisma: PrismaService) {}
  private readonly logger = new Logger(PostsService.name);

  create(createPostDto: CreatePostDto) {
    return this.prisma.post.create({ data: createPostDto });
  }

  findAll() {
    this.logger.log('記事一覧を取得します');
    return this.prisma.post.findMany();
  }

  findOne(id: number) {
    return this.prisma.post.findUnique({ where: { id } });
  }

  update(id: number, updatePostDto: UpdatePostDto) {
    return this.prisma.post.update({
      where: { id },
      data: updatePostDto,
    });
  }

  remove(id: number) {
    return this.prisma.post.delete({ where: { id } });
  }
}
PrismaServiceのモックを用意する
ユニットテストでは、Prisma自体の動作は対象外とし、テスト対象メソッドがPrismaの特定メソッドを正しく呼び出しているかを検証します。
  const mockPrismaService = {
    post: {
      create: jest.fn(),
      findMany: jest.fn(),
      findUnique: jest.fn(),
      update: jest.fn(),
      delete: jest.fn(),
    },
  };
jest.fn()で空の関数を用意し、呼び出し回数や引数を検証できるようにしています
テストコード全体
最終的なテストコードは下記のようになります。
import { Test, TestingModule } from '@nestjs/testing';
import { PostsService } from './posts.service';
import { PrismaService } from '../prisma/prisma.service';
import { Logger } from '@nestjs/common';

describe('PostsService', () => {
  let service: PostsService;

  const mockPrismaService = {
    post: {
      create: jest.fn(),
      findMany: jest.fn(),
      findUnique: jest.fn(),
      update: jest.fn(),
      delete: jest.fn(),
    },
  };

  beforeEach(async () => {
    const module: TestingModule = await Test.createTestingModule({
      providers: [
        PostsService,
        {
          provide: PrismaService,
          useValue: mockPrismaService,
        },
      ],
    }).compile();

    service = module.get<PostsService>(PostsService);
  });

  afterEach(() => {
    jest.clearAllMocks();
  });

  it('should call prisma.post.create with correct data', async () => {
    const dto = { title: 'Test', content: 'Content' };
    await service.create(dto);

    expect(mockPrismaService.post.create).toHaveBeenCalledWith({
      data: dto,
    });
  });

  it('should call prisma.post.findMany and log a message', async () => {
    const logSpy = jest.spyOn(Logger.prototype, 'log').mockImplementation();

    await service.findAll();

    expect(mockPrismaService.post.findMany).toHaveBeenCalled();
    expect(logSpy).toHaveBeenCalledWith('記事一覧を取得します');

    logSpy.mockRestore();
  });

  it('should call prisma.post.findUnique with correct id', async () => {
    await service.findOne(42);

    expect(mockPrismaService.post.findUnique).toHaveBeenCalledWith({
      where: { id: 42 },
    });
  });

  it('should call prisma.post.update with correct id and data', async () => {
    const dto = { title: 'Updated', content: 'Updated content' };

    await service.update(99, dto);

    expect(mockPrismaService.post.update).toHaveBeenCalledWith({
      where: { id: 99 },
      data: dto,
    });
  });

  it('should call prisma.post.delete with correct id', async () => {
    await service.remove(7);

    expect(mockPrismaService.post.delete).toHaveBeenCalledWith({
      where: { id: 7 },
    });
  });
});
テストコードについて補足します。
let service: PostsService;

const mockPrismaService = {
  post: {
    create: jest.fn(),
    findMany: jest.fn(),
    findUnique: jest.fn(),
    update: jest.fn(),
    delete: jest.fn(),
  },
};

beforeEach(async () => {
  const module: TestingModule = await Test.createTestingModule({
    providers: [
      PostsService,
      {
        provide: PrismaService,
        useValue: mockPrismaService,
      },
    ],
  }).compile();

  service = module.get<PostsService>(PostsService);
});
- beforeEach で毎回テスト環境を構築
- TestingModule を使って PostsService を注入
- PrismaService を本物ではなく mockPrismaService に差し替え
- これにより PostsService 内で this.prisma.post.create() などが使われても、本物のDBには一切アクセスしないよう制御しています。
  afterEach(() => {
    jest.clearAllMocks();
  });
- 各テストごとに
jest.fn()の呼び出し履歴をリセット
it('should call prisma.post.create with correct data', async () => {
  const dto = { title: 'Test', content: 'Content' };
  await service.create(dto);
  expect(mockPrismaService.post.create).toHaveBeenCalledWith({ data: dto });
});
- 入力された
dtoがそのままcreateメソッドに渡されているかを確認
it('should call prisma.post.findMany and log a message', async () => {
  const logSpy = jest.spyOn(Logger.prototype, 'log').mockImplementation();

  await service.findAll();

  expect(mockPrismaService.post.findMany).toHaveBeenCalled();
  expect(logSpy).toHaveBeenCalledWith('記事一覧を取得します');

  logSpy.mockRestore();
});
findMany()が呼び出されたことを確認- ログメッセージ "記事一覧を取得します" が実際に出力されたかも確認
it('should call prisma.post.findUnique with correct id', async () => {
  await service.findOne(42);
  expect(mockPrismaService.post.findUnique).toHaveBeenCalledWith({
    where: { id: 42 },
  });
});
- IDを引数に取る
findUnique()の呼び出し確認
it('should call prisma.post.update with correct id and data', async () => {
  const dto = { title: 'Updated', content: 'Updated content' };
  await service.update(99, dto);
  expect(mockPrismaService.post.update).toHaveBeenCalledWith({
    where: { id: 99 },
    data: dto,
  });
});
where条件と更新内容が正しく渡されているかを確認
it('should call prisma.post.delete with correct id', async () => {
  await service.remove(7);
  expect(mockPrismaService.post.delete).toHaveBeenCalledWith({
    where: { id: 7 },
  });
});
- 指定されたIDで
deleteが呼び出されているかを確認
Jestの設定
次にJestでパスを解決するための設定を行います。
  "jest": {
    "moduleFileExtensions": [
      "js",
      "json",
      "ts"
    ],
    "rootDir": "src",
    "testRegex": ".*\\.spec\\.ts$",
    "transform": {
      "^.+\\.(t|j)s$": "ts-jest"
    },
    "collectCoverageFrom": [
      "**/*.(t|j)s"
    ],
    "coverageDirectory": "../coverage",
    "testEnvironment": "node",
+   "moduleNameMapper": {
+     "^src/(.*)$": "<rootDir>/$1"
+   }
  }
{
  "compilerOptions": {
    "module": "commonjs",
    "declaration": true,
    "removeComments": true,
    "emitDecoratorMetadata": true,
    "experimentalDecorators": true,
    "allowSyntheticDefaultImports": true,
    "target": "ES2023",
    "sourceMap": true,
    "outDir": "./dist",
    "baseUrl": "./",
    "incremental": true,
    "skipLibCheck": true,
    "strictNullChecks": true,
    "forceConsistentCasingInFileNames": true,
    "noImplicitAny": false,
    "strictBindCallApply": false,
    "noFallthroughCasesInSwitch": false,
+   "resolveJsonModule": true,
+   "paths": {
+     "src/*": ["src/*"]
+   }
  }
}
Jestでユニットテストの実行
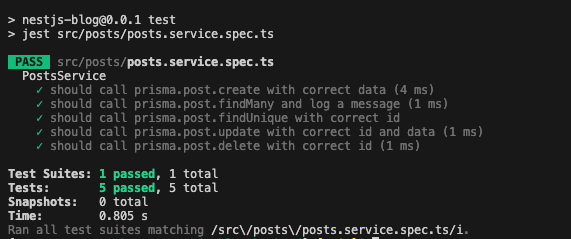
設定が完了しましたので、ユニットテストを実行します。
cd backend
npm run test -- src/posts/posts.service.spec.ts
テストが正常終了したことが確認できました。
Controllerを通したE2Eテスト
Service層のユニットテストに続いて、次はアプリケーション全体の挙動を確認する E2E(End-to-End)テスト を導入します。
E2Eテストでは、NestJSアプリケーションを実際に立ち上げ、HTTP経由でリクエストを送信し、レスポンスの内容を検証します。
コントローラーからサービス、Prisma経由でのDBアクセスまで、すべての処理を1本のリクエストでテストできるため、本番に近い動作確認が行えるのが大きなメリットです。
E2Eテスト構成とツール
@nestjs/testing: アプリケーション全体をテスト用に立ち上げるためのNest公式ユーティリティsupertest: 起動したHTTPサーバーに対してリクエストを送信し、レスポンスを検証するためのライブラリ
テスト用のDBを用意する
E2Eテストでは、実際のデータベースに対してCRUD操作を行います。
このため、開発用とは完全に分離された「テスト専用DB」を用意します。
docker-composeに test-db を追加
services:
  db:
    image: postgres:15
    container_name: nestjs-postgres
    ports:
      - "5432:5432"
    environment:
      POSTGRES_USER: postgres
      POSTGRES_PASSWORD: postgres
      POSTGRES_DB: nestjs_blog
    volumes:
      - db-data:/var/lib/postgresql/data

+ test-db:
+   image: postgres:15
+   container_name: nestjs-postgres-test
+   ports:
+     - "5433:5432"
+   environment:
+     POSTGRES_USER: postgres
+     POSTGRES_PASSWORD: postgres
+     POSTGRES_DB: test_db
+   volumes:
+     - test-db-data:/var/lib/postgresql/data

volumes:
  db-data:
+ test-db-data:
.env.test.local にDB接続情報を定義
DATABASE_URL=postgresql://postgres:postgres@localhost:5433/test_db
JestからDB接続情報を読み込むよう設定
.env.test.localを読み込むためのコードを新たに用意し、読み込んだ後に明示的に環境変数を上書きします。
import * as dotenv from 'dotenv';
import * as path from 'path';

const testEnv = dotenv.config({
  path: path.join(process.cwd(), '.env.test.local'),
});

Object.assign(process.env, {
  ...testEnv.parsed,
});
Jestでテストを実行する前にこのファイルを起動します。
{
  "moduleFileExtensions": ["js", "json", "ts"],
  "rootDir": "../",
  "moduleNameMapper": {
    "^src/(.*)$": "<rootDir>/src/$1"
  },
  "testEnvironment": "node",
  "testRegex": ".e2e-spec.ts$",
  "transform": {
    "^.+\\.(t|j)s$": "ts-jest"
  },
+ "setupFiles": [
+   "<rootDir>/src/config/dotenv/unit-test-config.ts"
+ ]
}
DB初期化対応
E2Eテストでは
- テスト開始時にスキーマを作る
- 必要な初期データだけを入れる
- テストごとにクリーンな状態に保つ
これが理想です。
今回はテスト開始時にデータをリセットする対応をとります。
import { PrismaClient } from '@prisma/client';
const prisma = new PrismaClient();

export async function resetDatabase() {
  await prisma.post.deleteMany();
}
テスト対象のPostテーブルに対して全件削除することで前回のテストで作成されたデータを消します。
テストコードの実装
import { Test, TestingModule } from '@nestjs/testing';
import { INestApplication } from '@nestjs/common';
import * as request from 'supertest';
import { AppModule } from '../src/app.module';
import { resetDatabase } from './utils/db';

describe('PostsController (e2e)', () => {
  let app: INestApplication;
  let createdPostId: number;
  beforeAll(async () => {
    await resetDatabase();
    const moduleFixture: TestingModule = await Test.createTestingModule({
      imports: [AppModule],
    }).compile();

    app = moduleFixture.createNestApplication();
    await app.init();
  });

  afterAll(async () => {
    await app.close();
  });

  it('/posts (POST)', async () => {
    const response = await request(app.getHttpServer())
      .post('/posts')
      .send({ title: 'E2E Test Title', content: 'E2E Test Content' })
      .expect(201);

    expect(response.body).toHaveProperty('id');
    expect(response.body.title).toBe('E2E Test Title');
    createdPostId = response.body.id;
  });

  it('/posts (GET)', async () => {
    const response = await request(app.getHttpServer())
      .get('/posts')
      .expect(200);
    expect(Array.isArray(response.body)).toBe(true);
    expect(response.body.length).toBeGreaterThan(0);
  });

  it('GET /posts/:id', async () => {
    const response = await request(app.getHttpServer())
      .get(`/posts/${createdPostId}`)
      .expect(200);

    expect(response.body.id).toBe(createdPostId);
    expect(response.body.title).toBe('E2E Test Title');
  });

  it('PATCH /posts/:id', async () => {
    const response = await request(app.getHttpServer())
      .patch(`/posts/${createdPostId}`)
      .send({ title: 'Updated Title', content: 'Updated Content' })
      .expect(200);

    expect(response.body.title).toBe('Updated Title');
    expect(response.body.content).toBe('Updated Content');
  });

  it('DELETE /posts/:id', async () => {
    await request(app.getHttpServer())
      .delete(`/posts/${createdPostId}`)
      .expect(200);

    await request(app.getHttpServer())
      .get(`/posts/${createdPostId}`)
      .expect(404);
  });
});
コードの解説をします。
let app: INestApplication;
let createdPostId: number;
app: テスト対象のNestJSアプリケーションを格納createdPostId:POST /postsで作成された投稿のIDを後続のテストで使いまわすための変数
beforeAll(async () => {
  await resetDatabase();
  const moduleFixture = await Test.createTestingModule({ imports: [AppModule] }).compile();
  app = moduleFixture.createNestApplication();
  await app.init();
});
- テスト前に初期化
resetDatabase():テスト前にDBの状態をクリーンにします(前回の投稿データを消す)- NestJSアプリケーションを立ち上げる処理:
Test.createTestingModule(...)でモジュールを準備app.init()で実際にアプリを起動
afterAll(async () => {
  await app.close();
});
- テスト後にアプリを終了してポートを解放
- メモリリークやポート重複の防止に重要
it('/posts (POST)', async () => {
  const response = await request(app.getHttpServer())
    .post('/posts')
    .send({ title: 'E2E Test Title', content: 'E2E Test Content' })
    .expect(201);

  expect(response.body).toHaveProperty('id');
  expect(response.body.title).toBe('E2E Test Title');
  createdPostId = response.body.id;
});
POST /posts: 投稿を作成- 正しく投稿を作成できるか確認
- 戻ってきた
idをcreatedPostIdに保存し、後続テストで再利用
it('/posts (GET)', async () => {
  const response = await request(app.getHttpServer())
    .get('/posts')
    .expect(200);
  expect(Array.isArray(response.body)).toBe(true);
  expect(response.body.length).toBeGreaterThan(0);
});
GET /posts: 一覧取得- 一覧取得ができるかを確認
- 配列で返ってくるか、少なくとも1件はあるかを検証
it('GET /posts/:id', async () => {
  const response = await request(app.getHttpServer())
    .get(`/posts/${createdPostId}`)
    .expect(200);

  expect(response.body.id).toBe(createdPostId);
  expect(response.body.title).toBe('E2E Test Title');
});
GET /posts/:id: 単一取得- 先ほど作った投稿が取得できるか
- ID・タイトルが一致しているかチェック
it('PATCH /posts/:id', async () => {
  const response = await request(app.getHttpServer())
    .patch(`/posts/${createdPostId}`)
    .send({ title: 'Updated Title', content: 'Updated Content' })
    .expect(200);

  expect(response.body.title).toBe('Updated Title');
  expect(response.body.content).toBe('Updated Content');
});
PATCH /posts/:id: 更新- タイトル・本文の両方が更新できているかを確認
it('DELETE /posts/:id', async () => {
  await request(app.getHttpServer())
    .delete(`/posts/${createdPostId}`)
    .expect(200);

  await request(app.getHttpServer())
    .get(`/posts/${createdPostId}`)
    .expect(404);
});
DELETE /posts/:id: 削除 → 再取得で404- 削除が成功したか
- その後に GET /posts/:id して 404 Not Found が返ることで、確実に削除されていることを検証
動作確認
下記の順番でE2Eテストを実施します。
テスト用DBを起動
docker-compose up -d test-db
マイグレーション適用
DATABASE_URL=postgresql://postgres:postgres@localhost:5433/test_db npx prisma migrate deploy
E2Eテスト実行
npm run test:e2e
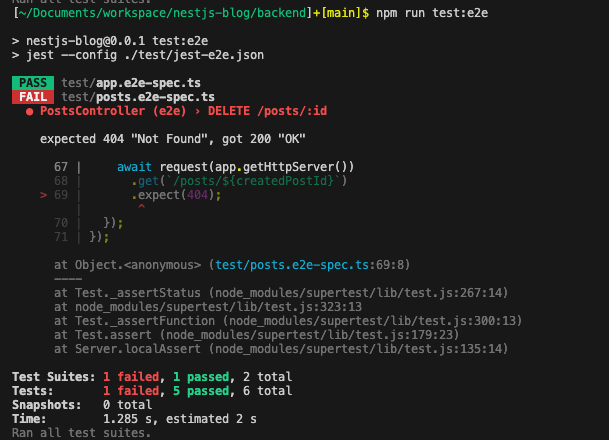
テストを実行したところ1件失敗しました。
削除APIのテストで削除後に再取得で404が返ってくる想定が200が返ってきました。
現状のコードは下記の通りとなります。
  findOne(id: number) {
    return this.prisma.post.findUnique({ where: { id } });
  }
この場合ですと、null が返っても NestJS は 200 を返してしまうことになります。
該当IDが存在しなかった場合は404を返すよう修正します。
import { NotFoundException } from '@nestjs/common';

async findOne(id: number) {
  const post = await this.prisma.post.findUnique({ where: { id } });
  if (!post) throw new NotFoundException(`Post with ID ${id} not found`);
  return post;
}
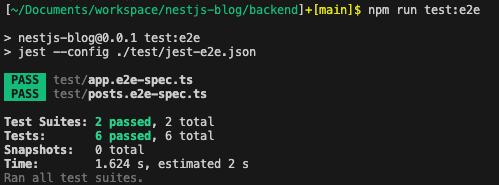
サービスを修正した後に再度E2Eテストを実行すると全て正常終了します。
import { Test, TestingModule } from '@nestjs/testing';
import { INestApplication } from '@nestjs/common';
import * as request from 'supertest';
import { AppModule } from '../src/app.module';
import { resetDatabase } from './utils/db';
import { Server } from 'http';

type PostResponse = {
  id: number;
  title: string;
  content: string;
};

describe('PostsController (e2e)', () => {
  let app: INestApplication;
  let httpServer: Server;
  let createdPostId: number;
  beforeAll(async () => {
    await resetDatabase();
    const moduleFixture: TestingModule = await Test.createTestingModule({
      imports: [AppModule],
    }).compile();

    app = moduleFixture.createNestApplication();
    await app.init();
    httpServer = app.getHttpServer() as Server;
  });

  afterAll(async () => {
    await app.close();
  });

  it('/posts (POST)', async () => {
    const response = await request(httpServer)
      .post('/posts')
      .send({ title: 'E2E Test Title', content: 'E2E Test Content' })
      .expect(201);

    const body = response.body as PostResponse;
    expect(body).toHaveProperty('id');
    expect(body.title).toBe('E2E Test Title');
    createdPostId = body.id;
  });

  it('/posts (GET)', async () => {
    const response = await request(httpServer).get('/posts').expect(200);
    const body = response.body as PostResponse[];
    expect(Array.isArray(body)).toBe(true);
    expect(body.length).toBeGreaterThan(0);
  });

  it('GET /posts/:id', async () => {
    const response = await request(httpServer)
      .get(`/posts/${createdPostId}`)
      .expect(200);
    const body = response.body as PostResponse;

    expect(body.id).toBe(createdPostId);
    expect(body.title).toBe('E2E Test Title');
  });

  it('PATCH /posts/:id', async () => {
    const response = await request(httpServer)
      .patch(`/posts/${createdPostId}`)
      .send({ title: 'Updated Title', content: 'Updated Content' })
      .expect(200);
    const body = response.body as PostResponse;

    expect(body.title).toBe('Updated Title');
    expect(body.content).toBe('Updated Content');
  });

  it('DELETE /posts/:id', async () => {
    await request(httpServer).delete(`/posts/${createdPostId}`).expect(200);

    await request(httpServer).get(`/posts/${createdPostId}`).expect(404);
  });
});
おわりに
ここまでで、NestJSアプリケーションの信頼性を高めるための基礎として、
- ログ出力の整備
- 共通化されたエラーハンドリング
- Service層・Controller層を対象としたユニットテストとE2Eテストの実装
といった取り組みを一通り進めてきました。
特に、E2EテストではDBも含めた一連の処理を再現可能な状態にし、実際の利用シナリオに近い形で動作確認できたことで、APIとしての信頼性が高まったと思います。
もちろん、まだ改善できる点や拡張できる余地も多くあります。ログの出力先をファイルや外部サービスに切り替えたり、ExceptionFilterのカバレッジを広げたり、テストデータの初期化戦略をより柔軟にしたり──。それらは今後のステップとしてまたご紹介できたらと思います。
次の記事はこちら
関連する技術ブログ
GraphQL・REST API の堅牢な認可設計:RBAC・ABAC・OAuth 2.0 のベストプラクティス
2024/05/13チャットアプリ(画像・PDF送信、ビデオ通話機能付き)
2024/07/15コンテナイメージを90%以上削減し、脆弱性を85%排除した話。DistrolessとTrivyで挑むDevSecOps
2025/10/29管理ダッシュボード機能(グラフ表示、データ取り込み)
2024/06/02NestJSで記事投稿APIを作ろう ─ Prisma導入とCRUD実装の基本
2025/04/12NestJS × Prismaで深めるDB設計 ─ モデル・リレーション・運用設計
2024/09/12NestJS × React × Railway:ブログUIを実装して本番環境へデプロイ
2024/10/25NestJSとReactで始めるWebアプリ開発 ─ ブログサイトを作りながら学ぶプロジェクト構成と設定管理
2025/04/11


