Test Automation with Jest and TypeScript: A Complete Guide from Basic Setup to Writing Type-Safe Tests
This post is also available in .
Introduction
Jest is widely supported by many developers as a tool that allows you to run tests for JavaScript and TypeScript easily and powerfully.
In this article, we will learn step by step from the basic usage of Jest to its integration with TypeScript and how to check test coverage.
The content is designed so that even beginners can confidently verify whether “the code they wrote is working correctly.” Let’s experience together the appeal of automated testing with Jest.
What is Jest?
Jest is a testing framework for JavaScript and TypeScript, and it is widely used especially for unit tests and integration tests in React applications.
It was developed by Facebook (now Meta) and is known as a powerful testing tool with the following features:
- Simple setup
- Mocking functionality
- Snapshot testing
- Coverage measurement
- Compatibility with TypeScript
- Asynchronous testing
This time, while referring to the official Jest documentation, we will look at items such as “simple setup,” “compatibility with TypeScript,” and “coverage measurement.”
Goal of this article
First, we will create a function in JavaScript, then write test code for that function and run automated tests using Jest.
After that, we will set up an environment so that we can run the same kind of automated tests with TypeScript.
Finally, we will create test code using a function that includes conditional branches and check the coverage.
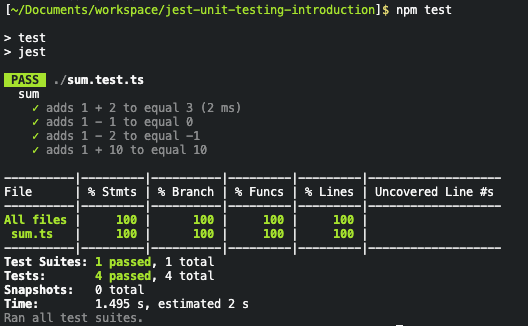
We will implement things up to the point where we can check test coverage as shown below.
Introducing Jest
Create any folder you like and install Jest.
mkdir jest-unit-testing-introduction
cd jest-unit-testing-introduction
npm install --save-dev jest
If you check package.json, you can see that Jest has been installed.
{
  "devDependencies": {
    "jest": "^29.7.0"
  }
}
First, create the function that will be the target of the test.
This function takes two arguments and returns their sum.
function sum(a, b) {
  return a + b;
}
module.exports = sum;
Once the function is created, we will write code to test its behavior.
This is a test that checks that when it receives 1 and 2, it returns 3.
const sum = require('./sum');

test('adds 1 + 2 to equal 3', () => {
  expect(sum(1, 2)).toBe(3);
});
Add the following code to package.json so that you can run the tests from the command line.
{
+   "scripts": {
+     "test": "jest"
+   },
  "devDependencies": {
    "jest": "^29.7.0"
  }
}
Then you can run the tests with the following command:
npm test
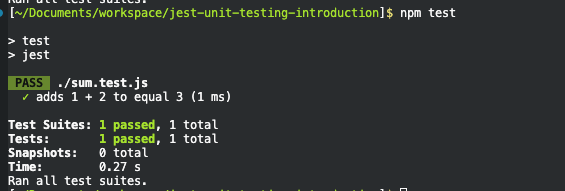
If you can confirm that one test has passed as shown below, the test with Jest is complete.
You may have found that writing tests themselves is surprisingly simple.
However, in real-world use, this alone is not enough, so from here we will look at how to run tests in various environments.
Enabling tests for TypeScript code
We will configure Jest so that it can be used in a TypeScript environment in the same way.
Jest configuration
First, create a Jest configuration file with the following command:
npm init jest@latest
Open the generated file and configure ts-jest so that Jest can use TypeScript directly.
/**
 * For a detailed explanation regarding each configuration property, visit:
 * https://jestjs.io/docs/configuration
 */

import type {Config} from 'jest';

const config: Config = {
  // All imported modules in your tests should be mocked automatically
  // automock: false,

  // Stop running tests after `n` failures
  // bail: 0,

  // The directory where Jest should store its cached dependency information
  // cacheDirectory: "/private/var/folders/1d/4kmnfhkx0plcjyzd6s9_2d100000gn/T/jest_dx",

  // Automatically clear mock calls, instances, contexts and results before every test
  clearMocks: true,

  // Indicates whether the coverage information should be collected while executing the test
  // collectCoverage: false,

  // An array of glob patterns indicating a set of files for which coverage information should be collected
  // collectCoverageFrom: undefined,

  // The directory where Jest should output its coverage files
  // coverageDirectory: undefined,

  // An array of regexp pattern strings used to skip coverage collection
  // coveragePathIgnorePatterns: [
  //   "/node_modules/"
  // ],

  // Indicates which provider should be used to instrument code for coverage
  coverageProvider: "v8",

  // A list of reporter names that Jest uses when writing coverage reports
  // coverageReporters: [
  //   "json",
  //   "text",
  //   "lcov",
  //   "clover"
  // ],

  // An object that configures minimum threshold enforcement for coverage results
  // coverageThreshold: undefined,

  // A path to a custom dependency extractor
  // dependencyExtractor: undefined,

  // Make calling deprecated APIs throw helpful error messages
  // errorOnDeprecated: false,

  // The default configuration for fake timers
  // fakeTimers: {
  //   "enableGlobally": false
  // },

  // Force coverage collection from ignored files using an array of glob patterns
  // forceCoverageMatch: [],

  // A path to a module which exports an async function that is triggered once before all test suites
  // globalSetup: undefined,

  // A path to a module which exports an async function that is triggered once after all test suites
  // globalTeardown: undefined,

  // A set of global variables that need to be available in all test environments
  // globals: {},

  // The maximum amount of workers used to run your tests. Can be specified as % or a number. E.g. maxWorkers: 10% will use 10% of your CPU amount + 1 as the maximum worker number. maxWorkers: 2 will use a maximum of 2 workers.
  // maxWorkers: "50%",

  // An array of directory names to be searched recursively up from the requiring module's location
  // moduleDirectories: [
  //   "node_modules"
  // ],

  // An array of file extensions your modules use
  // moduleFileExtensions: [
  //   "js",
  //   "mjs",
  //   "cjs",
  //   "jsx",
  //   "ts",
  //   "tsx",
  //   "json",
  //   "node"
  // ],

  // A map from regular expressions to module names or to arrays of module names that allow to stub out resources with a single module
  // moduleNameMapper: {},

  // An array of regexp pattern strings, matched against all module paths before considered 'visible' to the module loader
  // modulePathIgnorePatterns: [],

  // Activates notifications for test results
  // notify: false,

  // An enum that specifies notification mode. Requires { notify: true }
  // notifyMode: "failure-change",

  // A preset that is used as a base for Jest's configuration
  preset: 'ts-jest',

  // Run tests from one or more projects
  // projects: undefined,

  // Use this configuration option to add custom reporters to Jest
  // reporters: undefined,

  // Automatically reset mock state before every test
  // resetMocks: false,

  // Reset the module registry before running each individual test
  // resetModules: false,

  // A path to a custom resolver
  // resolver: undefined,

  // Automatically restore mock state and implementation before every test
  // restoreMocks: false,

  // The root directory that Jest should scan for tests and modules within
  // rootDir: undefined,

  // A list of paths to directories that Jest should use to search for files in
  // roots: [
  //   "<rootDir>"
  // ],

  // Allows you to use a custom runner instead of Jest's default test runner
  // runner: "jest-runner",

  // The paths to modules that run some code to configure or set up the testing environment before each test
  // setupFiles: [],

  // A list of paths to modules that run some code to configure or set up the testing framework before each test
  // setupFilesAfterEnv: [],

  // The number of seconds after which a test is considered as slow and reported as such in the results.
  // slowTestThreshold: 5,

  // A list of paths to snapshot serializer modules Jest should use for snapshot testing
  // snapshotSerializers: [],

  // The test environment that will be used for testing
  testEnvironment: "node",

  // Options that will be passed to the testEnvironment
  // testEnvironmentOptions: {},

  // Adds a location field to test results
  // testLocationInResults: false,

  // The glob patterns Jest uses to detect test files
  // testMatch: [
  //   "**/__tests__/**/*.[jt]s?(x)",
  //   "**/?(*.)+(spec|test).[tj]s?(x)"
  // ],

  // An array of regexp pattern strings that are matched against all test paths, matched tests are skipped
  // testPathIgnorePatterns: [
  //   "/node_modules/"
  // ],

  // The regexp pattern or array of patterns that Jest uses to detect test files
  // testRegex: [],

  // This option allows the use of a custom results processor
  // testResultsProcessor: undefined,

  // This option allows use of a custom test runner
  // testRunner: "jest-circus/runner",

  // A map from regular expressions to paths to transformers
  // transform: undefined,

  // An array of regexp pattern strings that are matched against all source file paths, matched files will skip transformation
  // transformIgnorePatterns: [
  //   "/node_modules/",
  //   "\\.pnp\\.[^\\/]+$"
  // ],

  // An array of regexp pattern strings that are matched against all modules before the module loader will automatically return a mock for them
  // unmockedModulePathPatterns: undefined,

  // Indicates whether each individual test should be reported during the run
  // verbose: undefined,

  // An array of regexp patterns that are matched against all source file paths before re-running tests in watch mode
  // watchPathIgnorePatterns: [],

  // Whether to use watchman for file crawling
  // watchman: true,
};

export default config;
The two places changed from the default are as follows:
  preset: 'ts-jest',
  testEnvironment: "node",
Installing required packages
Install the packages needed to use TypeScript all at once.
npm install --save-dev ts-jest ts-node @types/jest typescript
Once the installation is complete, rename the files to .ts and modify the code as follows:
- function sum(a, b) {
+ function sum(a: number, b: number) {
  return a + b;
}

- module.exports = sum;
+ export { sum }
- const sum = require('./sum');
+ import { sum } from './sum';

test('adds 1 + 2 to equal 3', () => {
  expect(sum(1, 2)).toBe(3);
});
Once the changes are complete, you can run the tests with the following command:
npm test
Increasing test cases
So far we have only created one test.
Let’s add a few more tests.
import { sum } from './sum';

describe('sum', () => {
  test('adds 1 + 2 to equal 3', () => {
    expect(sum(1, 2)).toBe(3);
  });

  test('adds 1 - 1 to equal 0', () => {
    expect(sum(1, -1)).toBe(0);
  });

  test('adds 1 - 2 to equal -1', () => {
    expect(sum(1, -2)).toBe(-1);
  });
})
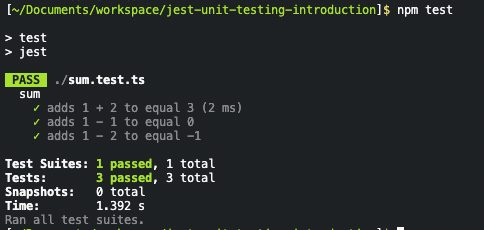
We increased the number of test cases from 1 to 3.
Once the changes are complete, you can run the tests with the following command:
npm test
The message has changed slightly from before.
Test Suites: Number of test files
Tests: Number of test cases
Time: Time taken to run the tests
That’s what they mean.
Automated testing for functions with conditional branches
Next, we will look at points to note when introducing tests for functions that include conditional branches.
First, slightly modify the sample function.
function sum(a: number, b: number) {
+   const c = a + b;
+   if (c > 10) {
+     return 10;
+   }
-   return a + b;
+   return c;
}

export { sum }
We added a condition so that if the total is greater than 10, it always returns 10.
Next, open the jest.config.ts file and change the settings so that you can check coverage.
  // Indicates whether the coverage information should be collected while executing the test
-   // collectCoverage: false,
+   collectCoverage: true,
What is coverage?
In Jest, coverage is an indicator that shows, in numbers or percentages, how much of your code is covered by tests. Specifically, it is used to check how much of the code is executed by the tests, and Jest can measure code coverage while running the tests.
Once the changes are complete, you can run the tests with the following command:
npm test
Coverage metrics
Coverage mainly has the following four metrics, each showing the coverage rate from a different perspective:
- Statements (Stmts)
Shows the percentage of all statements in the code that were executed. A statement is a single operation such as let x = 5; or console.log(x);.
- Branches
Shows the percentage of different branch paths, such as conditional branches and switch statements, that were executed by the tests. For example, whether both the if and else parts of an if statement were executed affects branch coverage.
- Functions (Funcs)
The percentage of functions that were executed. It is an indicator to check whether all functions in the code are being tested.
- Lines
Shows the percentage of lines of code that were executed. It indicates which lines of code were executed by the tests.
Looking back at our current tests, Funcs (functions) is at 100%, but the other metrics are not at 100%.
This is because we did not include in our tests the case where the total is greater than 10 and must always return 10.
Let’s add one more test case.
+   test('adds 1 + 10 to equal 10', () => {
+     expect(sum(1, 10)).toBe(10);
+   });
If you run this test, all the metrics should now be at 100%.
Why is coverage important?
Coverage is useful as an indicator of how much of your code is covered by tests, but high coverage does not necessarily equal high quality.
However, if coverage is low, there is a high possibility that important logic or conditional branches are not being tested, so checking coverage and increasing the coverage rate helps reduce bugs and unintended behavior.
Conclusion
By using Jest, you can increase the reliability of your code and detect bugs early.
Also, by combining it with TypeScript, you can enjoy the benefits of static typing while writing tests, resulting in a more robust development experience.
Through this article, I hope you have mastered the basics of Jest and will take the next step to try more advanced features such as mocks and snapshot testing.
Testing is a powerful weapon that supports development. Make use of this knowledge to enjoy efficient and reassuring development.
Recommended articles
This is an article introducing React Testing Library, a library for testing React components.
This is an article explaining how to implement end-to-end tests for Express applications using Supertest and Jest.
Questions about this article 📝
If you have any questions or feedback about the content, please feel free to contact us.Go to inquiry form
Related Articles
Implement E2E tests with Playwright to achieve user-centric testing including inter-system integration
2023/10/02Implementing Essential UI Component Tests for Frontend Development with React Testing Library
2023/09/20Test Strategy in the Next.js App Router Era: Development Confidence Backed by Jest, RTL, and Playwright
2025/04/22Complete Guide to Web Accessibility: From Automated Testing with Lighthouse / axe and Defining WCAG Criteria to Keyboard Operation and Screen Reader Support
2023/11/21How to Easily Build a Web API with Express and MongoDB [TypeScript Compatible]
2024/12/09Express (+ TypeScript) Beginner’s Guide: How to Quickly Build Web Applications
2024/12/07Complete Guide to Refactoring React: Improve Your Code with Modularization, Render Optimization, and Design Patterns
2025/01/13ESLint / Prettier Introduction Guide: Thorough Explanation from Husky, CI/CD Integration, to Visualizing Code Quality
2024/02/12


